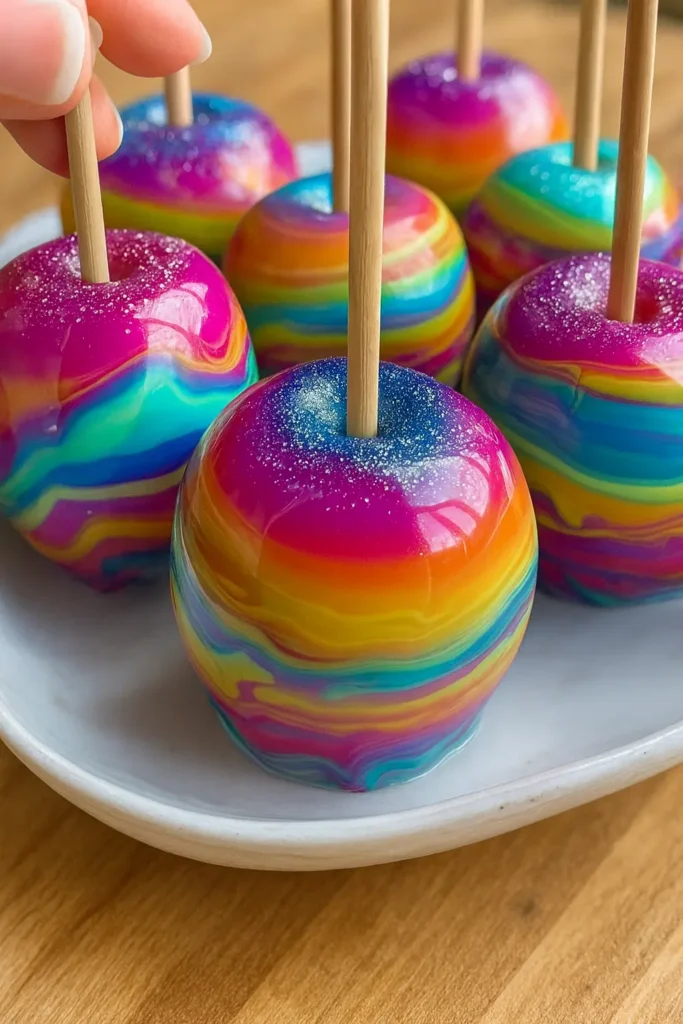
Who says candy apples have to be boring red? With rainbow candy apples, you can transform a classic fall fair favorite into a dazzling party showstopper. These bright, shimmering apples are crunchy, colorful, and oh-so magical! Did you know that the candy apple was first invented in 1908 by a candy maker experimenting with cinnamon? Today, we’re taking that tradition up a notch with swirls of neon food coloring and edible glitter. Whether you’re prepping for a carnival, birthday, or just want a sweet kitchen project, rainbow candy apples will steal the spotlight every time!

What You’ll Need for Rainbow Candy Apples
The first time I tried making candy apples at home, I thought it was just apples, sugar, and food coloring. Oh boy, I was wrong. The syrup kept sliding off because I hadn’t removed the wax on the apple skins. Lesson learned—the prep matters just as much as the ingredients! So before you even heat up a pan, let’s talk about what you actually need to pull off those perfect shimmering rainbow candy apples.
Choosing the Right Apples
If you’ve ever bitten into a mushy candy apple, you know the disappointment. The crunch is half the magic. Granny Smith apples are my go-to—they’re tart, crisp, and balance out the sweet coating. Honeycrisp is another solid choice if you want something naturally sweeter. Whatever you do, skip the mealy apples like Red Delicious. They look pretty but taste like wet cardboard under the candy shell.
Sticks That Don’t Wiggle
This one sounds silly, but a wobbly stick will drive you nuts. I’ve had candy apples crack mid-dip because the stick shifted. Wooden craft sticks or thick skewers work best. If you’re feeling extra, you can buy those fancy carnival-style striped sticks online, but plain wooden ones are just fine.
The Candy Syrup Base
Here’s the backbone of your rainbow apples:
- 3 cups sugar (granulated, nothing fancy)
- 1 cup light corn syrup (keeps the candy from turning gritty)
- 1 cup water
- ½ teaspoon cream of tartar (helps prevent crystallization)
You’ll also want a candy thermometer—trust me on this. Guessing the hard crack stage is how I ended up with sticky apples that glued themselves to parchment paper. Aim for 300°F, no shortcuts.
Flavors & Colors
Vanilla extract is the classic choice, but I’ve played around with cinnamon oil and even cotton candy essence. The flavor change makes people go, “Wait—what is that?” in the best way. As for colors, gel or neon food coloring gives you the brightest swirls. Don’t cheap out with liquid drops—they’ll fade and muddy your rainbow.
Sparkle Factor
This step is optional, but edible glitter or shimmer dust is what takes these from “cute” to “wow.” I once made a batch without glitter for a school fair, and the kids actually asked, “Where’s the sparkle?” Never again. A little dusting makes them look like something straight out of a fairytale.
👉 Quick Tip: Wash and dry your apples, then dip them in boiling water for a few seconds to melt off the wax coating. If you skip this, the syrup won’t stick properly, and you’ll be left with sad, half-covered apples.
Step-by-Step Guide to Making Rainbow Candy Apples
The first time I tried making rainbow candy apples, I was overconfident. I thought, “How hard can it be? Melt some sugar, dunk an apple, done.” Yeah… about that. My syrup burned into a dark brown mess, the kitchen smelled like campfire, and I ended up scrubbing pots for hours. So, trust me when I say: follow the steps carefully, and you’ll end up with gorgeous, glossy rainbow apples instead of a sticky disaster.
Step 1: Prep the Apples
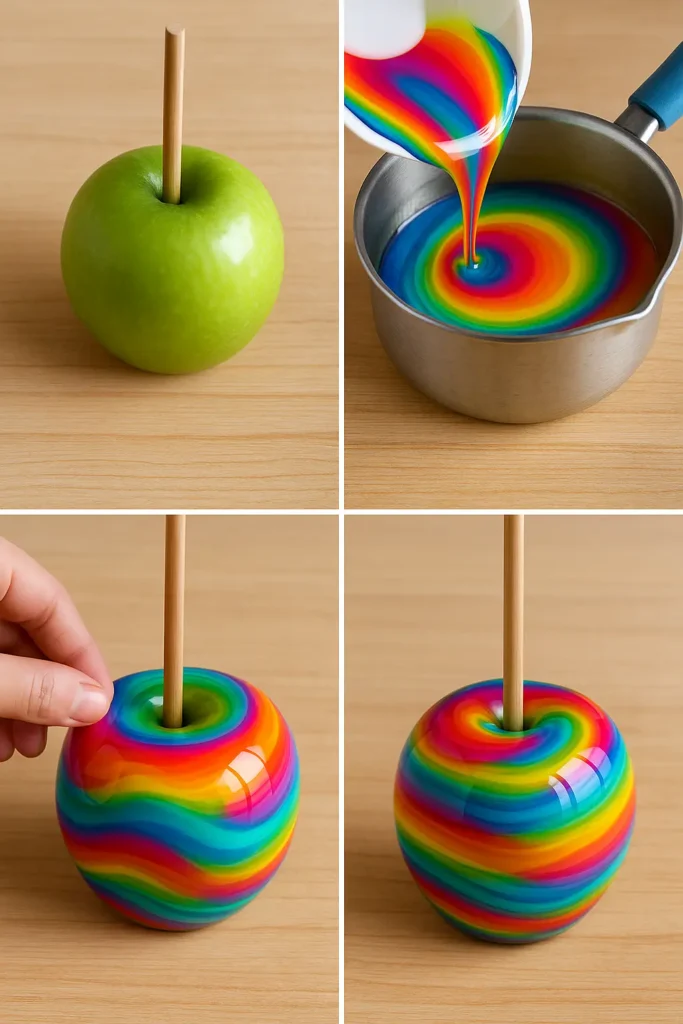
Start by washing your apples and removing the wax coating. The wax is sneaky—it makes the candy slide right off. I dip mine in boiling water for a few seconds, wipe them with a towel, and then make sure they’re completely dry. Insert wooden sticks right into the center of each apple. Wiggle them in tight—you don’t want the apple falling off mid-dip.
Step 2: Make the Candy Syrup
This is where the magic begins. In a heavy-bottom saucepan, combine:
- 3 cups sugar
- 1 cup light corn syrup
- 1 cup water
- ½ teaspoon cream of tartar
Stir just enough to mix it, then stop touching it. That’s the trick—if you stir too much while it’s boiling, sugar crystals form and ruin everything. Cook over medium-high heat until it hits 300°F (the hard crack stage). Don’t eyeball it, use a candy thermometer. I once “guessed” and ended up with chewy apples that glued my teeth together.
Step 3: Add Flavor and Divide
Take the syrup off the heat and stir in ½ teaspoon of vanilla extract (or your flavor of choice). Then quickly divide the syrup into smaller bowls—one for each color you’re using. This part can get messy fast, so work quickly before the syrup thickens.
Step 4: Swirl the Colors
Now for the fun part! Add gel food coloring to each bowl, then carefully dip your apple into one color and swirl through another. Don’t overdo it—too much swirling turns into a brownish blob. I’ve found that dipping halfway into red and then twisting into blue gives the prettiest galaxy vibe.
Step 5: Let Them Set
Place the dipped apples on parchment paper (not wax paper, trust me). The coating will harden in about 10 minutes. If you want to go extra magical, sprinkle edible glitter while the syrup is still tacky. That sparkle catches the light and makes them look straight-up enchanted.
👉 Quick Tip: Tilt your bowl instead of dunking the apple straight down. It’s easier to swirl multiple colors, and you’ll waste less syrup.

Tips and Tricks for Perfect Candy Apples
Making rainbow candy apples looks easy on Instagram, but let me tell you—it’s a little trickier than it seems. I’ve had apples stick to the paper, colors bleed into each other, and once, I even cracked a tooth because the coating came out rock-hard. Over the years, though, I’ve figured out a few tricks that make the process smoother and the results way prettier.
Keep the Sugar from Crystallizing
This one tripped me up the first couple of times. If you stir the syrup too much once it starts boiling, crystals form and the coating goes cloudy. The trick? Just swirl the pan gently if you need to, but don’t stir. And always wipe down the sides of the pot with a damp pastry brush while it’s cooking—those little sugar grains can trigger a chain reaction.
Swirl Colors Without Making Mud
The rainbow effect can be magical… or it can turn into brown sludge if you over-swirl. I dip into one color first, then roll the apple gently into another color. Two or three colors max per apple works best. If you try to fit in all six rainbow shades every time, it just looks messy. Lesson learned after my first batch looked like swamp apples.
The Glossy Finish Secret
Ever see those candy apples that look shiny enough to see your reflection? That’s because the syrup hit the right temperature. Too low, and you’ll get a dull, sticky finish. Too high, and it’ll taste burnt. Aim for exactly 300°F. No shortcuts. And don’t forget to use parchment paper for cooling—wax paper will melt and stick. I learned that the hard way.
Troubleshooting Sticky Apples
If your apples come out sticky even after cooling, it usually means the weather was humid or the syrup didn’t reach the hard crack stage. One trick I’ve used is storing finished apples in individual cellophane bags. Not only do they stay shiny longer, but they also make adorable party favors.
Storage That Actually Works
Honestly, candy apples are best eaten the same day. But if you need to keep them overnight, wrap each one tightly in plastic wrap or a bag. Never stick them in the fridge—they’ll sweat and turn into a sticky mess. Room temperature, in a cool, dry spot, works best.
👉 Quick Tip: If you’re making these for a party, prep everything first—sticks in apples, parchment lined, colors ready—because once that syrup hits the right stage, you’ve only got a few minutes before it starts hardening.
Fun Variations and Serving Ideas
Here’s the thing—once you nail the basic rainbow candy apple, it’s hard not to experiment. I went through a whole phase where every party needed “themed” candy apples. Some were gorgeous… others, well, let’s just say my “pumpkin spice apple” ended up looking like it had been rolled in dirt. But the fun of these treats is how creative you can get.
Glitter-Coated Carnival Apples
The easiest upgrade is edible glitter. I’m not exaggerating when I say kids will fight over the sparkly ones. I usually sprinkle the glitter while the coating is still tacky, so it sticks perfectly. One year, I made an entire glitter batch for a school fundraiser and they sold out first. Shiny things always win.
Galaxy-Inspired Apples
This one was a happy accident. I was trying to do a blue-purple swirl, and the black food gel tipped in. Instead of ruining it, I got this amazing “space galaxy” vibe. Add a little edible silver star dust, and suddenly you’ve got cosmic candy apples. They look incredible under party lights.
Holiday Versions
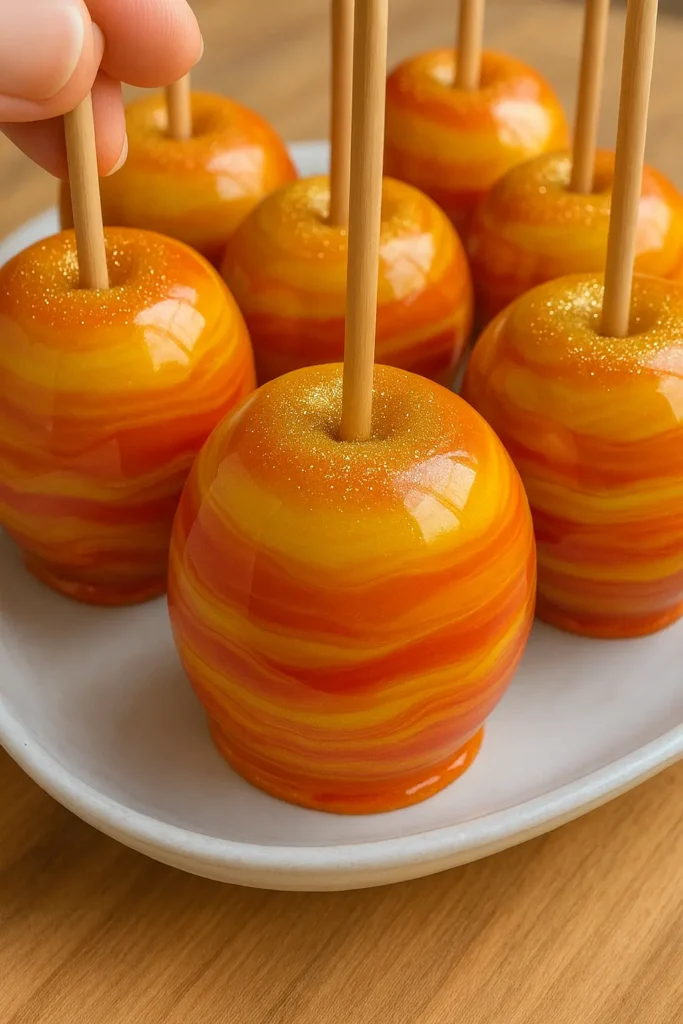
Rainbow is fun year-round, but themed apples steal the show at holidays. For Easter, I’ve done soft pastels—pink, lavender, baby blue. At Christmas, I go for bold red and green with gold glitter. Honestly, they double as edible decorations. I once stuck a batch in the middle of a holiday table, and people thought they were ornaments.
Mini Rainbow Apples
If you’ve got kids, try this: use crabapples or tiny apples and make “candy apple pops.” They’re bite-sized, way less messy, and perfect for little hands. Plus, you can crank out a dozen without breaking the bank on giant apples. My niece calls them “fairy apples,” and I’m not correcting her.
Over-the-Top Decorating
Sometimes, I go full carnival and roll the dipped apples in sprinkles, crushed candy, or even edible gold flakes. Just dip fast, because once the candy hardens, nothing will stick. The first time I tried this, I waited too long and ended up with a sad pile of sprinkles at the bottom of the tray. Lesson: move quick!
👉 Quick Tip: If you’re serving these at a party, display them upright in a block of Styrofoam or a cake pop stand. It looks way cuter than just laying them flat, and guests can grab one without smudging the rest.

Why Rainbow Candy Apples Are the Ultimate Party Treat
I’ve made a lot of party desserts over the years—cupcakes, cake pops, you name it—but rainbow candy apples always get the biggest reaction. The first time I brought a tray of them to a birthday party, the kids’ eyes literally lit up. Even the adults couldn’t stop asking, “Wait, did you really make those?” That’s when I knew these weren’t just a snack… they were the event.
They’re Eye-Catching and Instagram-Worthy
Honestly, candy apples are edible art. The glossy swirl of colors and a little sparkle look amazing in photos. I’ve had people line up their phones before taking a bite. So if you’re hosting a party, you don’t even need decorations—the apples themselves become the centerpiece.
Fun to Make with Family
When I say these are a group project, I mean it. My kids love choosing the food coloring combos, and my husband insists on being the “official taste tester.” Sure, it gets messy, but that’s half the fun. Everyone ends up sticky, laughing, and eating way too many apples.
Easy to Customize
That’s the beauty of rainbow candy apples—you can make them fit any theme. Glittery unicorn party? Done. Dark and moody galaxy vibe? Easy. Holiday twist with red and green? Yep. You can even do school colors for a graduation party. It’s like having one recipe that can be reimagined a hundred ways.
Affordable Party Showstopper
I used to spend a fortune on custom cakes for events. Now, a bag of apples, some sugar, and a little glitter cost me maybe 15 bucks, and I end up with treats that everyone talks about. It’s the best bang for your buck when you want something that looks fancy but doesn’t wreck your budget.
Nostalgia with a Twist
There’s something about candy apples that feels nostalgic—like carnivals, fairs, and Halloween nights. Adding rainbow swirls just makes them magical. People bite in expecting the classic crunch, and then they see the colors shimmer. It’s childhood and creativity rolled into one.
👉 Quick Tip: Serve them as the grand finale at your party—bring out the tray after everyone’s eaten. Trust me, the “oohs” and “aahs” you’ll get are worth the extra drama.
At the end of the day, rainbow candy apples are more than just a sweet treat—they’re a little burst of magic you can make right in your kitchen. I still remember my first successful batch; I put them on the table, and everyone stopped talking just to stare at them. That’s the kind of reaction you want at a party, right?
They’re crunchy, colorful, and surprisingly easy once you get the hang of the syrup. Sure, there might be a few sticky pans and a couple of “oops” apples along the way, but that’s part of the fun. And honestly, those imperfect ones still taste just as good.
If you’re looking for a dessert that doubles as decoration, this is it. Whether it’s a birthday, a carnival theme, or just a random Saturday project, rainbow candy apples are guaranteed to steal the show.
So go ahead—grab some apples, pick your favorite colors, and give it a try. And hey, if you love how they turn out, snap a pic and share it on Pinterest. You never know who you’ll inspire to make their own shimmering rainbow batch!
PrintHow to Make Rainbow Candy Apples at Home (2025 Guide)
These shimmering Rainbow Candy Apples turn a classic fair treat into a magical, colorful party showstopper! Crunchy, glossy, and sprinkled with edible glitter, they’re a nostalgic favorite with a dazzling twist.
Ingredients
- 6 Granny Smith or Honeycrisp apples (washed, wax removed, and dried)
- 6 wooden sticks or skewers
- 3 cups granulated sugar
- 1 cup light corn syrup
- 1 cup water
- ½ teaspoon cream of tartar
- ½ teaspoon vanilla extract (or flavoring of choice like cinnamon oil or cotton candy essence)
- Gel or neon food coloring (variety of colors)
- Edible glitter or shimmer dust (optional)
- Parchment paper
- Candy thermometer
Instructions
- Wash apples, remove wax by dipping in boiling water briefly, dry completely, and insert wooden sticks tightly into each apple.
- In a heavy saucepan, combine sugar, corn syrup, water, and cream of tartar. Stir gently to combine, then cook over medium-high heat without stirring until mixture reaches 300°F (hard crack stage).
- Remove from heat and stir in vanilla extract or desired flavoring.
- Divide hot syrup into separate bowls and tint each with different gel food coloring. Work quickly before syrup hardens.
- Tilt bowls slightly and dip apples into one color, then swirl into a second color for a rainbow effect. Avoid overmixing to prevent muddy colors.
- Place dipped apples on parchment paper (not wax paper) and let set for 10 minutes. Sprinkle with edible glitter while still tacky if desired.
- Allow apples to fully cool and harden. Serve same day for best crunch and appearance.
Notes
Prep is key: remove apple wax or the syrup won’t stick. Use a candy thermometer to avoid sticky or burnt syrup. Avoid humid conditions for best results. Two to three colors per apple create the most striking effect.


