Looking to add a little magic to your Halloween decorations this year? 🎃 Glow-in-the-dark pumpkins are the answer! They’re spooky, sparkly, and surprisingly simple to make. Whether you’re planning a haunted house party or just want something cool on your porch, these pumpkins will literally light up the night. And hey, here’s a fun stat: over 70% of Halloween decorators say they prefer DIY over store-bought – so why not join the crafty crowd?
With just a few tools, a splash of paint, and your wildest imagination, you’ll turn boring pumpkins into glow-tastic art. Let’s dive in!
What You Need to Get Started
Okay, I’ll be real with you: the first time I tried making glow-in-the-dark pumpkins, I thought I could just slap some neon paint on a gourd and call it a night. Big mistake. The paint peeled right off, and it looked more like a melted highlighter than Halloween magic.
So yeah, trust me when I say: the right tools make all the difference.
🛍 The Must-Haves
You definitely need a small to medium pumpkin. I’ve done both real and fake ones—real pumpkins give that classic autumn vibe, but if you’re like me and want something that lasts longer than a week, foam pumpkins are the move. They’re easier to paint too, especially for kids with little hands.
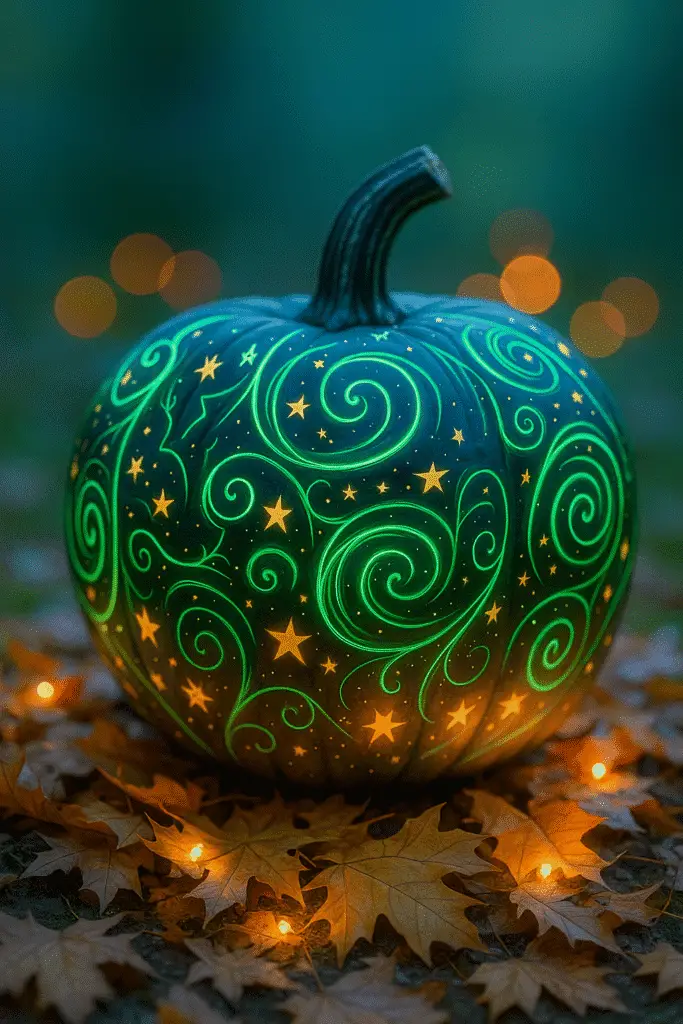
Glow-in-the-dark paint? Don’t skimp. The cheap dollar-store stuff barely lights up. I found this water-based glow paint on Amazon that worked like a charm. You’ll want more than one color—trust me, layering bright green and electric blue creates this wild galaxy effect. I even mixed a little white into my neon pink once and it made the glow pop under blacklight.
You’ll need:
- 2-3 paintbrushes (different sizes for details and base coat)
- A mixing palette or old plate
- Paper towels (for the inevitable mess)
- A tablecloth or newspaper to protect your kitchen table (learned that the hard way)
- Optional but fun: stencils! I printed out a little bat stencil and it turned out so freakin’ cool.
🎨 Don’t Forget the Lighting
If you really wanna wow folks, grab a cheap blacklight. It makes the glow paint look radioactive in the best way. I set mine up outside and it turned our porch into a mini haunted mansion. My neighbor thought I hired a decorator—nope, just $12 on Amazon and some elbow grease.
😅 Lessons Learned the Hard Way
One time I forgot to dry the pumpkin before painting… yeah, that stuff slid right off like butter on a hot skillet. Now I always dry them completely and give them a quick rub-down with a paper towel before painting.
Also, don’t use oil-based paint—it won’t glow properly and it smells like a science experiment gone wrong. Stick with water-based glow paint, and your nose (and sanity) will thank you.
Prepping Your Pumpkin for Painting
If I had a dollar for every time I rushed this step and regretted it… well, I could probably buy a whole cart of glow paint. 😅
Seriously though, prepping your pumpkin matters. It’s the difference between a smooth glow and a crusty paint job that flakes off by morning. Trust me, you do not want your hard work to peel away like a bad sunburn.
🧽 Wash It Like You Mean It
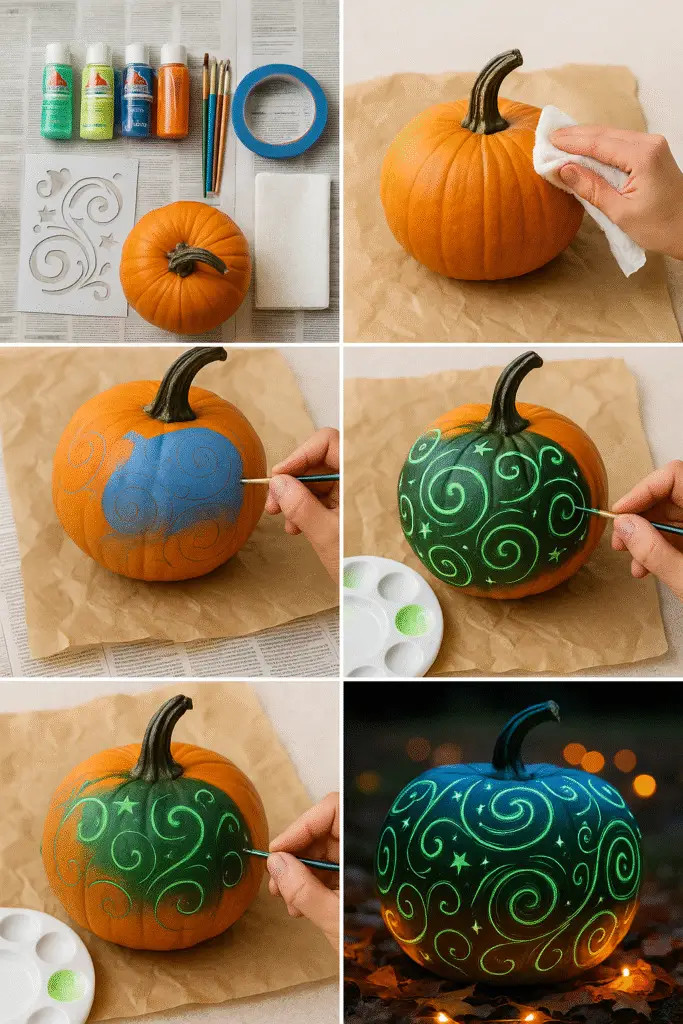
First things first, scrub your pumpkin. No, not like you’re washing dishes, but close. I usually use a damp cloth or paper towel and give it a good wipe-down to get rid of dirt and waxy residue. If it’s a real pumpkin, don’t skip this part! That natural gunk will straight-up repel your paint like it owes it money.
And hey—dry it completely. I made the rookie mistake of painting on a damp pumpkin once, and it was like trying to paint on a wet balloon. Disaster.
🧵 Stencils: Game Changer or Overkill?
Depends on your vibe. I love freehanding glow-y swirls and spooky shapes, but last Halloween I tried using bat and spider web stencils with my niece—and holy moly, it turned out amazing. Just tape ‘em down lightly with painter’s tape so the design doesn’t smudge, and use a small brush to dab paint over them.
If you’re using a fake foam pumpkin (those smooth ones from craft stores), stencils stick even better. Real pumpkins are bumpy little jerks sometimes, but you can make it work with a little patience and angled brush strokes.
🛠 Set Up Like a Pro
Lay down newspaper, or better yet, grab an old vinyl tablecloth that you don’t care about. I used to skip this and thought I could “just be careful” — fast forward to neon green splatter on my white kitchen table. Big yikes.
Keep a roll of paper towels nearby (because paint + kids = chaos), and maybe even wear an old shirt. Bonus tip: put your pumpkin on a lazy Susan or an upside-down bowl so you can spin it while painting. You’ll feel like a pro, and your lines will look way cleaner.
Painting Techniques for the Best Glow
Alright, here’s where the magic happens—and where I usually end up with paint in my hair and at least one “oops” pumpkin that looks like it survived a rave. Still, nothing beats the moment you flick off the lights and see your pumpkin actually glow for the first time. I swear, it never gets old.
🌈 Layer It Up, Baby
So here’s the trick: glow-in-the-dark paint needs layers. Like, several. Don’t just slap one coat on and wonder why it’s not glowing like the moon. You gotta build it up.
I start with a thin, even coat using a medium brush. Let that bad boy dry (takes about 10-15 minutes if you’re inside with a fan on), then go again. I usually do three or four coats, especially if I’m using lighter colors like yellow or blue. Neon green tends to show up quickest, but I still double up for that full-blast glow.
Pro tip: If your glow paint is super transparent, paint a white base layer first. It’s like priming a wall before you paint it—it makes everything pop way more.
🖌 Use the Right Brushes
Don’t overthink this, but a mix of brushes helps a ton. I keep:
- A medium flat brush for large sections
- A small round brush for edges or filling in stencils
- A tiny detail brush for outlines or little stars, ghosts, etc.
Also… don’t use your nicest brushes. Glow paint is thick and kinda gritty. I’ve ruined a few nice ones and cried inside. Use the cheap craft-store multipacks. You’ll thank me later.
🔦 Boost It With Blacklight
Want your pumpkin to look like it’s charged with radioactive ghost juice? Use a blacklight. I wave one over my pumpkins while painting just to check the glow level between layers—it’s weirdly satisfying and super helpful.
And remember: glow paint “charges” under regular light, but under a blacklight? WHOA. Total game changer. Makes your work look pro even if you’re winging it like I usually am.
🎯 Don’t Fear the Mistakes
Here’s something I learned the messy way: it’s okay to mess up. One time I tried painting a spooky ghost face and it ended up looking like a melting marshmallow. So I just covered the whole thing with glow swirls and stars. Boom—new design.
You can always paint over dry areas or even scrape off goofs with a toothpick. That’s the beauty of DIY—imperfection adds character, or at least that’s what I tell myself when it goes sideways. 😂
Display Ideas That Light Up the Night
Once you’ve spent hours turning your pumpkin into a glowing masterpiece, you don’t wanna just plop it on the front step and call it a day. Nope. You want people to stop and say, “Okay… that’s awesome.”
I learned the hard way that placement makes all the difference. My first glow pumpkin sat in a dim corner of the porch—looked more like a soggy melon than a Halloween showstopper. Let’s not repeat that mistake.
✨ Find the Perfect Glow Zone
Your pumpkin needs to “charge” in the light, so during the day, I set mine near a window or outside to soak up the sun. But when night hits? It’s showtime.
Best spots I’ve tried:
- Right on the porch steps for that eerie welcome
- In flower beds or garden edges (they look super cool surrounded by fall leaves)
- On windowsills, facing the street – spooky curb appeal!
- On top of upside-down flower pots for height—adds dimension if you’re grouping them
I’ve even lined a few along the walkway using little battery-powered spotlights underneath. My yard looked like a haunted runway. Total win.
💡 Light It Right
Glow-in-the-dark paint is cool, but if you really want that WOW factor, pair it with lights. I swear by blacklights—those mini LED ones you can snag online for cheap. Just aim them at your pumpkins and boom, you’ve got instant haunted garden vibes.
Another trick? Stick battery-powered fairy lights inside a fake pumpkin. I poked tiny holes in one like a constellation and wrapped lights inside—it looked like a glowing night sky. My niece called it the “pumpkin planet.” I’ll take it.
🧙♀️ Go Big With Group Displays
If one pumpkin’s cool, a whole glowing crew is even better. Last year I made a bunch with different faces—some spooky, some goofy—and grouped them in a half-circle near the firepit. We called it the “Pumpkin Coven.”
Even better if you mix real pumpkins with foam ones for texture. Toss in a few dry branches, hay bales, and maybe a skeleton or two? Insta-Halloween scene, no fog machine required.
😬 Quick Fail I Learned From
One year I put a painted pumpkin too close to a candle-lit jack-o’-lantern. Glow paint + heat = not friends. It bubbled up and cracked. Major bummer. So yeah—keep the glow crew away from open flame.
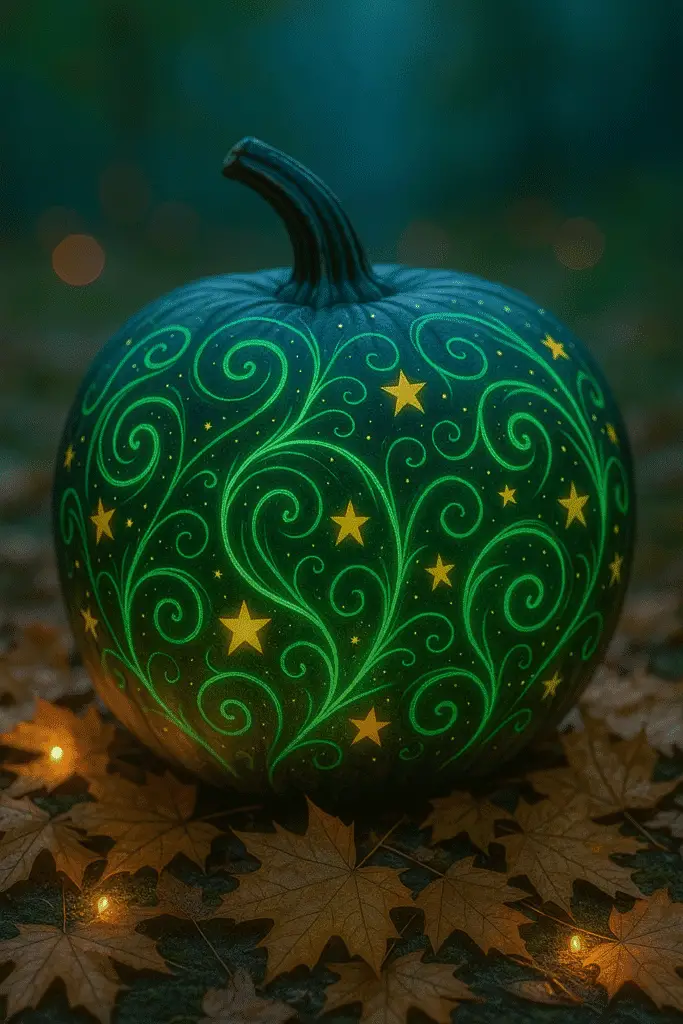
Tips, Tricks & Creative Variations
Alright, once you’ve got the basics down, this is where you can really let your Halloween freak flag fly. I went from painting simple smiley faces to turning pumpkins into glowing monsters, constellations, and even a glittery “cat-o’-lantern” (yes, it had ears). This is the fun part—where you go off-script and get weird with it.
✨ Add Some Sparkle, You Rebel
Okay, hot take: glitter makes everything better. I used to hate the mess, but after I dusted some onto a freshly painted pumpkin one year, I was sold. It catches the light and makes the glow look like fairy magic. Just sprinkle it over wet paint and let it set—no glue needed.
Want even more sparkle without the mess? Holographic glow-in-the-dark vinyl stickers. Total game changer. I stuck tiny stars and moons all over one pumpkin and it looked like a mini galaxy.
🎨 Spray Paint for Speed Demons
If you’re short on time (or just impatient like me), grab a can of glow-in-the-dark spray paint. I tested it on a few foam pumpkins, and it covered way faster than the brush stuff. Just wear gloves and do it outside—trust me, your lungs and your lawn will thank you.
Oh, and don’t forget to rotate the pumpkin while spraying. My first attempt left a big blank patch on the back that I didn’t notice until it was glowing like half a moon. Whoops.
🕷 Make ‘Em Spooky-Cute
Want to give your pumpkin some personality? Add accessories! I’ve hot-glued googly eyes, pipe cleaner legs, even tiny witch hats on top. My daughter turned hers into a glow spider and named it Kevin. Kevin now makes a yearly appearance on our porch.
You can also tape off areas before painting to create geometric shapes or stripes. Just peel the tape off after your last coat dries. It gives a cool contrast, especially if you use different glow colors.
👻 The Best (and Worst) Ideas I’ve Tried
Best: Glow paint mixed with a little neon acrylic paint for daytime color + nighttime glow. It doubled the effect and made the pumpkin look good even when it wasn’t glowing.
Worst: Using hot glue before the paint dried. It peeled the paint right off. Disaster.
Random tip: You can actually “recharge” your pumpkins during trick-or-treat night by hitting them with a flashlight or blacklight every so often. Just a minute or two makes them pop again.
And there you go — your complete guide to making glow-in-the-dark pumpkins at home! From gathering the perfect supplies to layering on that magical paint and setting up a head-turning display, you’re now equipped to make Halloween 2025 your most creative yet.
Whether you’re crafting with kids, decorating your porch, or just vibing with your inner artist, glow-in-the-dark pumpkins are a fun, safe, and seriously satisfying DIY. Remember: don’t rush the process, embrace the mess, and let your creativity run wild. Every glow-up (literally) starts with a blank pumpkin and a brush.
Loved this guide? Pin it to your Halloween board on Pinterest and share the glow with your fellow DIYers. Let’s light up the season — one pumpkin at a time! 🎃✨
PrintHow to Make Glow-in-the-Dark Pumpkins at Home for Halloween 2025
Turn ordinary pumpkins into spooky, glowing masterpieces with this fun and creative DIY project. Perfect for Halloween parties, porch décor, or just adding a little glow to your night.
Ingredients
- Small to medium pumpkin (real or foam)
- Glow-in-the-dark paint (water-based, multiple colors)
- 2-3 paintbrushes (various sizes)
- Mixing palette or old plate
- Paper towels
- Tablecloth or newspaper for protection
- Optional: stencils
- Optional: blacklight for extra glow
- Optional: glitter, vinyl stickers, or accessories (googly eyes, pipe cleaners, hats)
Instructions
- Wash and dry your pumpkin thoroughly to remove dirt or residue.
- Set up your workspace with newspaper or a tablecloth, brushes, and supplies.
- If using stencils, tape them gently to the pumpkin.
- Apply a thin base coat of white paint if needed for extra brightness.
- Paint on the first thin coat of glow paint using a medium brush and let dry 10–15 minutes.
- Repeat with 2–3 additional coats until the glow effect is strong.
- Use smaller brushes for details, outlines, or stencil designs.
- Optional: sprinkle glitter on wet paint or add vinyl stickers and accessories.
- Charge the pumpkin under sunlight or a blacklight for best glow results.
- Display on porch steps, in flower beds, on windowsills, or group with other pumpkins for a glowing Halloween setup.
Notes
Always let each coat dry completely before adding another. Keep pumpkins away from open flames or heat sources, as glow paint can bubble or crack. Recharge glow paint under a flashlight or blacklight during Halloween night for maximum effect.


