Have you ever seen sunlight dance through petals or leaves? 🌸✨ Now imagine capturing that beauty in a glowing piece of art you made at home. With just a few kitchen ingredients, you can create Bioplastic Nature Suncatchers—a craft that blends science, sustainability, and creativity. They’re fun for kids, eco-friendly for families, and stunning when hung in a sunny window.
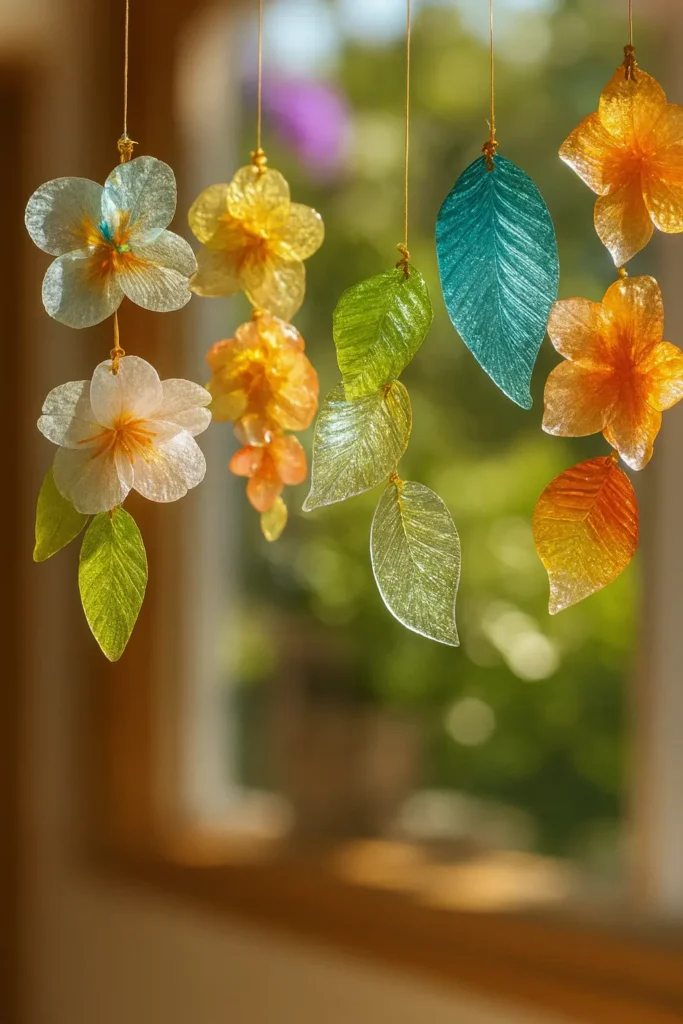
What Are Bioplastic Nature Suncatchers?
When I first heard the term “bioplastic,” I thought it sounded way too scientific for a kitchen project. Honestly, I pictured a chemistry lab, not my stovetop. But then I learned it’s basically just a fancy name for a simple mix you can make with cornstarch, water, and vinegar. That’s it. No special equipment, no complicated formulas—just pantry staples that most of us already have at home.
The cool part? Bioplastic behaves a lot like the plastic we’re used to, except it’s made from plants and it eventually breaks down instead of sitting around for centuries. When you turn it into a suncatcher, you get this eco-friendly art project that feels like magic the moment sunlight hits it.
Kitchen Science Made Fun
I’ll admit, my first attempt was kind of a disaster. I cooked the mixture too long, and instead of a smooth gel, I ended up with something that looked like gummy candy stuck to the pan. But after a couple tries, I figured out the trick: stir gently and pull it off the heat as soon as it thickens. It’s messy, yes, but it’s also the kind of messy that makes kids giggle and adults secretly impressed with themselves.
Bioplastic is a great way to sneak in a little science lesson without anyone rolling their eyes. Kids get to see how liquid ingredients transform into a solid material right before their eyes. It’s chemistry in action, but without the intimidating test tubes or lab coats.
Art Meets Nature
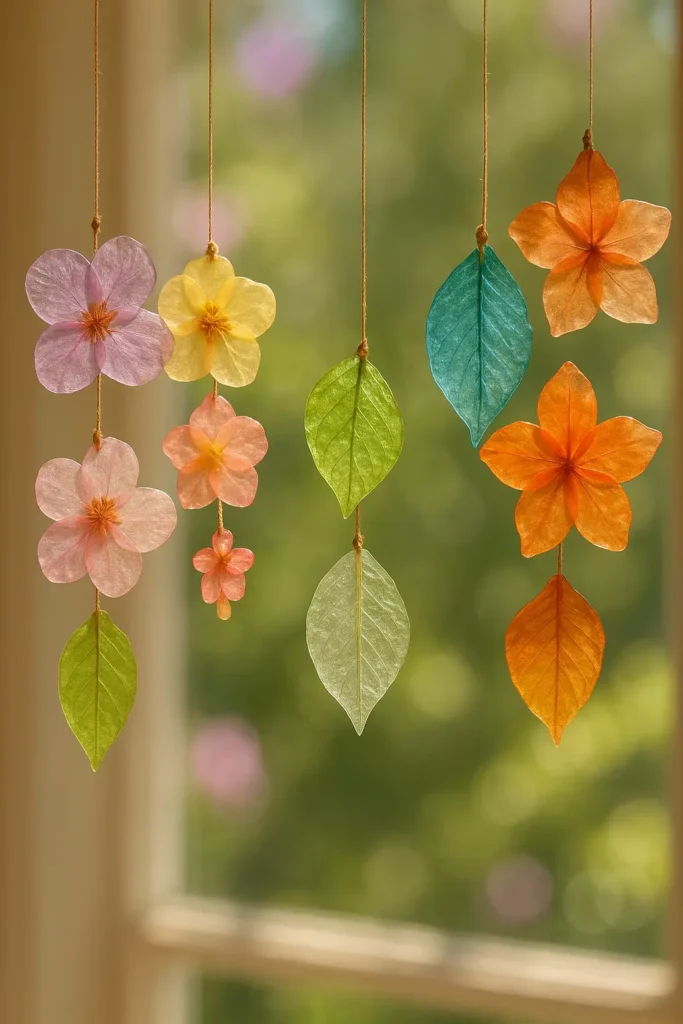
The fun really begins once the goo is spread out and you press in petals, leaves, or tiny herbs. That’s when it stops looking like a kitchen experiment and starts becoming art. I remember my daughter carefully placing a daisy in the middle of her circle and whispering, “Don’t move!” like she was handling a priceless treasure. When it dried, the sunlight streaming through made the flower glow like stained glass.
These little discs of bioplastic capture nature in such a delicate way. Every leaf vein, every tiny petal detail becomes part of the artwork. It’s not just crafting—it feels like bottling up a piece of the garden.
Why They’re Worth Making
What I love most is that these suncatchers check so many boxes. They’re eco-friendly, which means no guilt about plastic waste. They’re educational, so kids pick up science without even realizing it. And they’re genuinely beautiful when hung in a sunny window. It’s rare to find a project that combines creativity, learning, and sustainability all in one go, but these do exactly that.
So, if you’ve ever wanted to turn a sunny corner of your home into a little gallery of glowing nature art, bioplastic suncatchers are the way to go. They’re proof that with just a few everyday ingredients and some imagination, you can create something both meaningful and beautiful.
Ingredients You’ll Need
The first time I tried making bioplastic suncatchers, I overcomplicated things. I thought I’d need some hard-to-find science supplies, but nope—everything was already in my kitchen. That’s one of the reasons I love this project so much. You don’t need fancy molds or pricey craft kits. Just a handful of simple items, a dash of patience, and maybe a willingness to laugh when things get a little messy.
Cornstarch, the Star of the Show
Cornstarch is the backbone of bioplastic. Without it, you’d just have vinegar soup. It thickens up when heated, turning into that gel-like base that eventually hardens into your suncatcher. I learned the hard way that not all cornstarch is equal—buy the fresh stuff. I once grabbed an old box from the back of the pantry, and let’s just say it didn’t set properly. The final “suncatcher” drooped like a sad pancake in the window.
Water to Hold It All Together
It sounds basic, but water is what helps the cornstarch cook into a gel instead of just burning in the pan. Too much water, though, and you’ll be waiting days for it to dry. I tried doubling the water once, thinking it would make the mixture smoother. Spoiler: it didn’t. It just made a puddle that never hardened. Stick to the recipe measurements, trust me on this one.
Vinegar for Durability
This one surprised me at first. Vinegar doesn’t just add tang to your cooking—it actually helps bioplastic stay stronger and less brittle. Without it, the mixture cracks too easily. My first batch without vinegar looked great for a day, then crumbled into pieces when I tried to peel it off the mat. So yes, don’t skip the vinegar, even if it makes your kitchen smell a little like salad dressing for a few minutes.
Nature’s Decorations: Leaves, Petals, and Herbs
This is where the magic happens. Once you’ve got your bioplastic spread out, you press in little pieces of nature. Thin petals work best because they let more light through. Thick leaves look cool, but sometimes they block too much sunlight. My favorite so far was using lavender sprigs—the smell lingered long after the suncatcher dried. It’s such a sweet, subtle bonus.
Tools That Make Life Easier
You’ll also want some wax paper or a silicone mat so the mixture doesn’t stick. I’ve tried parchment paper too, but wax paper really is the winner here. Cookie cutters are optional, but they’re a game-changer if you want nice shapes. My kids love stars and hearts, while I usually go for simple circles. A small paintbrush helps smooth the edges, though a wet finger works just as well if you don’t mind getting sticky.
Simple but Powerful
What’s amazing is that these ordinary ingredients—cornstarch, water, vinegar, and a few garden treasures—turn into something that looks like delicate stained glass. It always surprises me how little it takes to make something so eye-catching. And honestly, I think that’s part of the charm. The project isn’t about perfection, it’s about experimenting, laughing at the mistakes, and ending up with something beautiful to hang in the window.
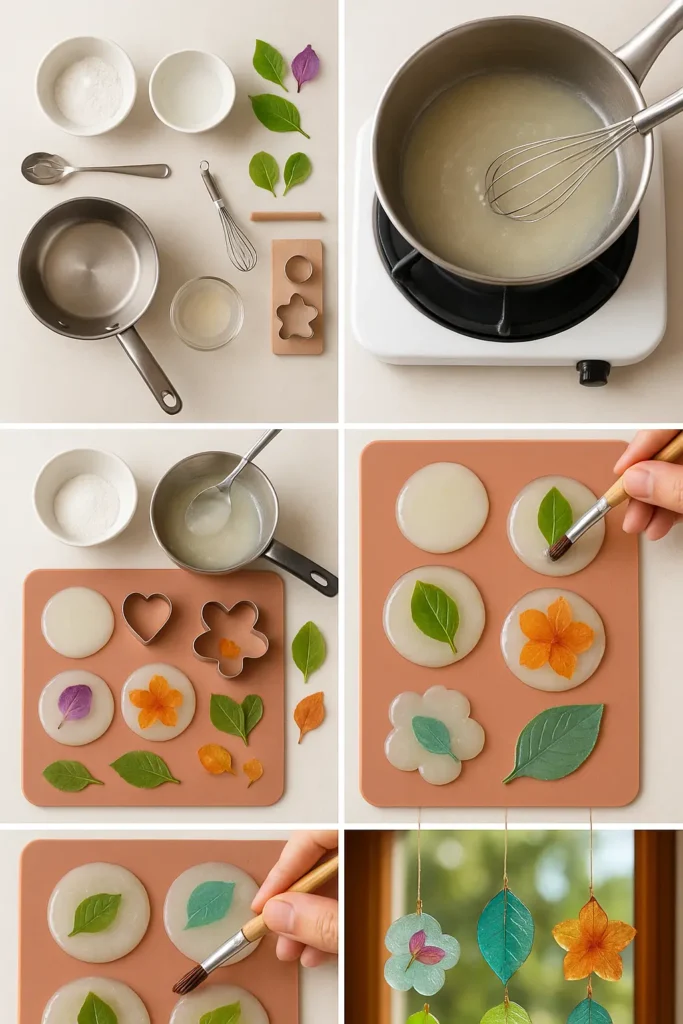
Step-by-Step Guide to Making Bioplastic Nature Suncatchers
I’ll be honest—when I first tried making these suncatchers, I didn’t follow the steps carefully, and the whole thing turned into a sticky disaster. So here’s the version I wish someone had handed me on day one. These steps will help you avoid the messes I made and actually get those glowing little discs to turn out beautifully.
Step 1: Mix the Ingredients
Grab a small saucepan and stir together 1 tablespoon of cornstarch, 1 tablespoon of water, and 1 teaspoon of vinegar. Stir until smooth. It should look a little like pancake batter at this stage. Don’t worry if it feels too thin—it’ll thicken as it heats. The first time I did this, I rushed through and didn’t mix properly, and ended up with lumps. Take a few extra seconds here; it’s worth it.
Step 2: Heat Gently Until It Thickens
Turn the stove on low and keep stirring. Slowly, the liquid will change into a gel. This is the fun part to watch with kids—it’s like a little science show happening right in the pan. Just don’t walk away. I once left mine for “just a second” and came back to something that looked like rubber cement. Keep the spoon moving until it’s the right texture: thick, but still spreadable.
Step 3: Prepare Your Surface
Lay down wax paper or a silicone mat on a flat surface. Trust me, don’t skip this step. If you try pouring the mixture straight onto a plate or tray, you’ll be chiseling it off later. I learned that lesson the hard way. Wax paper peels off easily once it’s dry, which means you’ll actually get to keep your creation instead of scraping it off in frustration.
Step 4: Pour and Shape
Spoon the mixture onto the surface in little puddles. If you want neat shapes, press cookie cutters onto the wax paper and pour the mixture inside them. I once tried free-pouring circles without guides… and ended up with blobs that looked like amoebas. Cute in their own way, but not exactly window-ready.
Step 5: Add Nature’s Touch
Now the fun part—press in petals, leaves, or herbs. Do it gently so they don’t tear. Thin petals work like stained glass, while small leaves give a rustic look. My son once used tiny rosemary sprigs, and when the sun hit them, it gave off the prettiest green glow. Experiment and see what catches your eye.
Step 6: Smooth the Edges
If you want cleaner edges, dip a brush or finger in water and smooth around the sides. This step isn’t mandatory, but it makes the suncatchers look more polished. I skip it when I’m working with younger kids because they actually love the wonky edges—it makes each one feel unique.
Step 7: Let Them Dry
Patience is the hardest part here. Let the suncatchers dry for 24–48 hours. I’ve tried speeding it up with a fan and even a hair dryer, but honestly, slow and steady works best. If you peel them up too early, they’ll warp or break apart. The wait is worth it when you see that final hardened shape.
Step 8: Hang and Enjoy
Once dry, thread a piece of string through or simply tape them to a sunny window. That’s when the magic happens. I still remember the first time I saw one catch the morning light—it looked like I had captured a piece of the garden and glued it to the sky. The kids stood there for a good ten minutes, just watching the colors shift as the sun moved.
That’s it. From pantry staples to glowing window art, all in a few simple steps. And honestly, even the failed attempts end up being fun memories, so don’t stress about perfection.
Creative Variations to Try
The first time I made bioplastic suncatchers, I stuck to the basics: plain cornstarch, vinegar, water, and a couple flower petals. They looked nice, but after a while, I started thinking, what if I added a little twist? That’s when I realized these suncatchers are like a blank canvas—you can play around with them endlessly. Some of my favorite projects have come from experimenting, even when things didn’t turn out the way I expected.
Adding a Splash of Color
Food coloring is the easiest way to take these up a notch. A drop or two in the mixture before pouring it onto the mat creates tinted discs that glow even brighter in the sunlight. I once made a batch with blue and green shades, and when the sun hit them, my window looked like ocean waves. Just don’t get too heavy-handed. I made that mistake once and ended up with suncatchers so dark they blocked more light than they let through. Subtle is the way to go.
Seasonal Petal Collections
Another fun variation is switching up the natural decorations based on the season. In spring, I love using daisies and cherry blossom petals. Summer is all about bright marigolds and zinnias. In fall, I’ve tried tiny bits of colorful leaves, and even though they’re not as see-through as petals, the earthy tones look stunning in a window. Winter is trickier, but herbs like rosemary or thyme add both beauty and a little fragrance.
Layered Designs
Here’s a trick I stumbled on by accident: layering. I poured a thin layer of the bioplastic, let it set for a couple hours, then added another thin layer with new petals inside. The result looked almost three-dimensional, like the leaves were floating between sheets of glass. It does take more time, but the effect is totally worth it if you’re aiming for something special.
Shapes Beyond Circles
I used to think suncatchers had to be round, but cookie cutters changed the game. Hearts, stars, butterflies—you name it. My kids go wild picking out the shapes. One time, my son insisted on making dinosaur-shaped suncatchers, and though they looked more like lumpy lizards, he was so proud to see them glowing in the sunlight. Shapes give each piece a personality, and it’s fun watching how different designs cast different shadows.
Mixing Nature with Sparkle
Okay, this one might not be totally natural, but sprinkling a pinch of glitter in the mixture makes the suncatchers sparkle when the light hits them. I know, glitter isn’t the most eco-friendly thing, so I use it sparingly, but the effect is undeniably magical. If you want to keep it fully sustainable, you can try biodegradable glitter instead.
Little Experiments Lead to Big Joy
What I’ve learned is that the best results come when you’re not afraid to experiment. Some of my “failures”—like the batch that came out blotchy or the time I tried layering too thick—still looked charming in their own imperfect way. Each variation tells its own little story, and that’s what makes them so special.
With a bit of imagination, these bioplastic suncatchers can be customized for holidays, seasons, or just for fun. Every window in your home can become a mini art gallery filled with glowing pieces of nature.
Tips for Success & Common Mistakes
After a few tries with bioplastic suncatchers, I realized something: the difference between a glowing masterpiece and a sticky mess often comes down to the little details. I’ve had plenty of “oops” moments, and honestly, they’ve been the best teachers. So here are the lessons I’ve picked up along the way, so you don’t have to scrape half-hardened bioplastic off your table like I did.
Don’t Overcook the Mixture
This one’s a biggie. The first time I made bioplastic, I thought, maybe if I let it cook just a little longer, it’ll get stronger. Nope. What I got was a stiff, rubbery chunk that was impossible to spread. The trick is to pull it off the heat as soon as it thickens into a smooth gel. If it looks like jelly, you’re golden. If it looks like glue, you’ve gone too far.
Use Thin Petals for Transparency
I once tried using big, thick rose petals because they looked gorgeous in the garden. The problem? They blocked so much light that the suncatcher turned into more of a shadow catcher. Thin, delicate petals work best—think daisies, pansies, or even herbs like parsley. They let the sunlight shine through and really bring out that stained-glass effect.
Be Patient With Drying
I get it—waiting 24 to 48 hours feels like forever, especially when kids are excited. I made the mistake of peeling one up after only 10 hours, and it curled at the edges like a potato chip. Not cute. The longer they dry, the stronger they’ll be. I’ve even left some for three full days when the air was humid, and the result was totally worth the wait.
Smooth Edges Save the Look
This is an optional step, but it makes a difference. A damp paintbrush or finger can tidy up those rough edges before the bioplastic hardens. The first batch I made without smoothing looked like melted pancakes. Still fun, but not as pretty when hung up. A little smoothing goes a long way if you want that polished, glass-like finish.
Store Them Wisely
Here’s something I learned the hard way: bioplastic can soften again if it gets too damp. I left a few suncatchers near a humid window during a rainy week, and they lost their shape. Now, I either hang them where it’s sunnier and drier or make sure they’re not pressed flat against condensation-prone glass.
Embrace Imperfection
This last one isn’t exactly a “tip,” but it’s important. Not every suncatcher will look perfect, and that’s part of the charm. Some will have bubbles, some might warp, and others might not catch the light the way you planned. But honestly? Those little imperfections make them feel more personal. Each one tells its own story—like nature’s version of a fingerprint.
So, take your time, don’t stress the small mistakes, and remember: even the “failures” end up looking beautiful in their own quirky way. That’s the real magic of bioplastic suncatchers.
Every time I walk past the window where our bioplastic suncatchers hang, I can’t help but pause for a second. The way sunlight filters through petals and leaves feels like a little reminder of how much beauty we can create with the simplest things. A bit of cornstarch, a splash of vinegar, a few petals plucked from the yard—that’s all it takes to turn ordinary kitchen ingredients into glowing works of art.
These suncatchers aren’t just decorations. They’re science experiments, art projects, and eco-friendly lessons all wrapped into one. Kids get to see chemistry in action, parents get a low-cost craft that actually looks gorgeous, and the planet gets a small win because we’re choosing sustainable materials over plastic. That’s a pretty powerful combination for something so simple.
I’ve made plenty of crafts with my kids, but this one has stuck with us. Maybe it’s because each suncatcher feels unique, carrying a little piece of a season or a memory. The daisy we picked on a spring walk, the rosemary sprig from our garden, even the silly “blob” shapes my son insisted were dinosaurs—they all tell a story when the light shines through.
If you’ve been looking for a creative project that sparks curiosity and adds a touch of nature’s glow to your home, give bioplastic suncatchers a try. Don’t worry about perfection. Some will come out flawless, others might warp a little—but every single one will make your window brighter and your heart lighter.
And hey, when you finish your masterpiece, don’t just hang it up—share it! Snap a picture of your glowing creation and post it on Pinterest. You never know who you’ll inspire to grab some cornstarch and petals and start their own sunny little science experiment. After all, the best part of crafting isn’t just making something—it’s passing along the joy to others.
PrintDIY Bioplastic Nature Suncatchers at Home (2025 Guide)
Create glowing, eco-friendly art with Bioplastic Nature Suncatchers using kitchen staples and garden treasures—fun for kids, beautiful for windows, and kind to the planet.
Ingredients
- 1 tablespoon cornstarch
- 1 tablespoon water
- 1 teaspoon vinegar
- Thin flower petals (e.g. daisies, pansies)
- Small herbs or leaves (like rosemary or parsley)
- Wax paper or silicone mat
- Cookie cutters (optional)
- Small paintbrush or water for smoothing (optional)
- String or tape for hanging
Instructions
- In a small saucepan, mix 1 tablespoon cornstarch, 1 tablespoon water, and 1 teaspoon vinegar until smooth.
- Heat gently on low, stirring constantly until the mixture thickens into a gel-like texture. Remove from heat immediately.
- Prepare a flat surface with wax paper or a silicone mat to prevent sticking.
- Spoon the mixture onto the surface in small puddles, or pour into cookie cutters for defined shapes.
- Gently press in flower petals, herbs, or leaves before the bioplastic sets.
- Use a damp paintbrush or finger to smooth the edges if desired.
- Let the suncatchers dry flat for 24–48 hours until fully hardened.
- Hang in a sunny window using tape or string and watch the sunlight bring them to life.
Notes
Use thin petals and herbs for the best light-catching effect. Don’t overcook the mixture—it should be gel-like, not rubbery. Allow full drying time to avoid curling or cracking.


