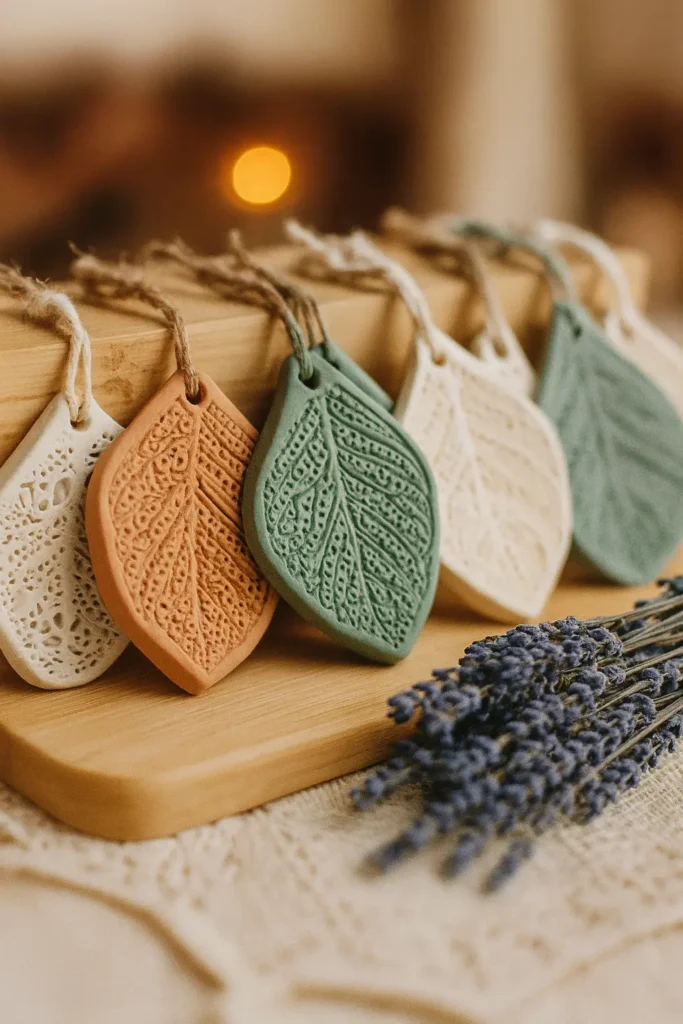
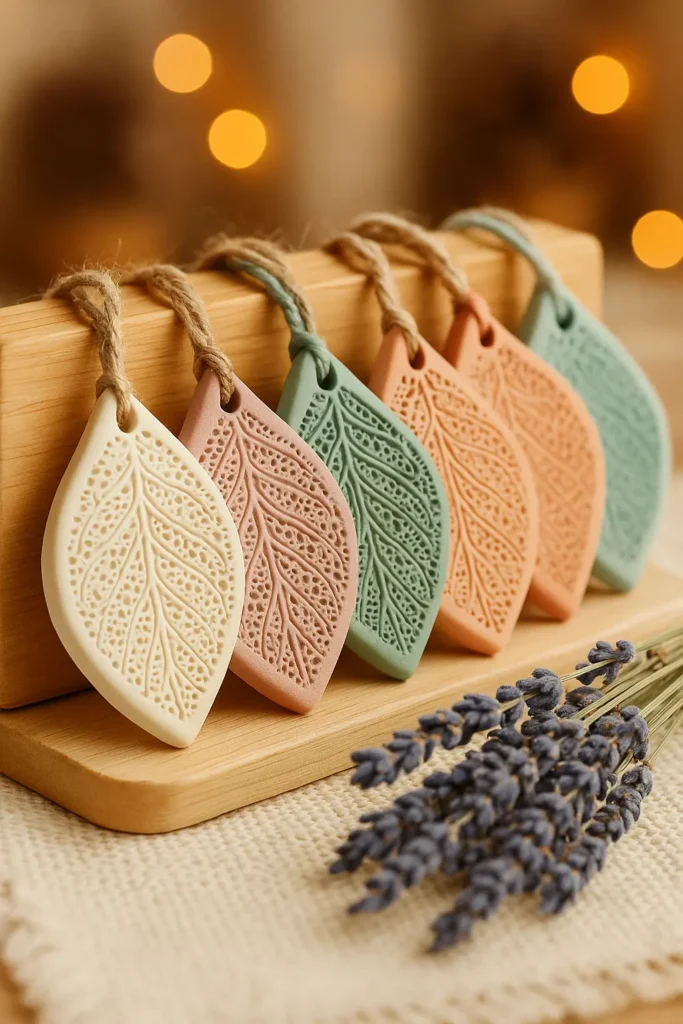
Ever walk into a room and instantly feel calmer because of a scent? That’s the magic of aromatherapy! But what if I told you that you can bottle that magic into a cute little clay stone—made with your own hands? Yep, you can make your own clay diffuser stones at home with just a few supplies and a dash of creativity. Whether you’re into spa vibes, love giving handmade gifts, or just want your house to smell less like leftovers and more like lavender—this DIY is calling your name.

Supplies You’ll Need for DIY Clay Diffuser Stones
Okay, full disclosure: the first time I tried to make clay diffuser stones, I totally winged it—and ended up with a batch that looked more like dried-up cookies than anything remotely Pinterest-worthy. 😅 Trust me, having the right supplies makes all the difference. Let’s break it down, friend-to-friend.
✨ Choosing the Right Clay
I’ve tried them all—polymer clay, oven-bake, and my personal fave: air-dry clay. Air-dry clay is the gold standard for diffuser stones because it’s porous enough to soak up essential oils, and you don’t need a kiln or anything fancy. I lean toward white or terracotta, but honestly? Any neutral color works beautifully.
💡 Tip: Avoid clays that harden too dense—your oils won’t absorb well and your stone won’t smell like much.
🍪 Molds & Cutters
Let’s talk shapes. You can go simple with metal cookie cutters or get fancy with silicone molds. I’ve used star shapes for holiday gifts, leaves for fall, and tiny moons just for fun. Silicone molds are easier if you want thickness and a little 3D texture, but cutters are faster for big batches.
Oh—and don’t forget a rolling pin (or, like me, a wine bottle in a pinch) to roll your clay out evenly.
📜 Wax Paper = Lifesaver
Seriously. Don’t skip the wax paper. Clay sticks to everything—your table, your hands, your soul (kidding… sort of). Wax paper keeps it all neat and makes cleanup way easier. Plus, it gives you a smoother surface to roll on.
🪡 Skewers, Toothpicks, or… Chopsticks?
If you plan to hang your diffuser stones, poke a small hole in the top before they dry. I’ve used toothpicks, skewers, and even a mechanical pencil once when I couldn’t find anything else. Works like a charm.
🎯 Pro tip: Wiggle the hole a little to make sure your ribbon or twine fits later. Once that clay dries, it’s game over.
🌿 Essential Oils: Pick Your Mood
Now, onto the best part—scents. Lavender is my go-to for the bedroom. Citrus for the kitchen. Peppermint in the car (hello, stay awake vibes). You only need 1–2 drops per stone, so a little bottle lasts ages.
If you’re not sure what to start with:
- Lavender: calm + sleep
- Lemon: clean + energizing
- Peppermint: fresh + focus
- Eucalyptus: spa-like + airy
Mix and match to your heart’s content.
🎀 Optional, But Cute
If you want to go the extra mile, grab some twine, ribbon, or even a little acrylic paint to jazz up your diffuser stones. I’ve painted initials on them when I’m giving them as gifts. People go nuts over that personal touch.
Honestly, getting your supplies together is half the fun. Once you’ve got your setup, you’ll be making these babies in batches like a diffuser stone factory. 😂
Next up: the actual making process! Spoiler alert—it’s so satisfying. Ready to roll?
Step-by-Step Guide to Making Clay Diffuser Stones
Alright, here’s where things get hands-on—and possibly a little messy. But that’s half the fun, right? Making your own clay diffuser stones at home is seriously satisfying. There’s something super calming about rolling clay and cutting out cute shapes while your whole kitchen smells like eucalyptus or orange peel.
I’ll walk you through what’s worked (and what’s failed—yep, I’ve made all the mistakes so you don’t have to).
1. Roll Out That Clay Like You’re Making Cookies
Start by laying down some wax paper. This is your new best friend. Keeps your table clean and your clay from sticking to everything.
Now grab a chunk of clay and roll it out to about ¼ inch thick. Too thin and your stone might snap; too thick and it takes forever to dry—and barely absorbs oil.
⚠️ Mistake I made once: rolled it super thick thinking it’d feel more “premium.” Yeah, it dried uneven and cracked. Not cute.
If you don’t have a rolling pin, a glass bottle or sturdy cup works in a pinch.
2. Cut Into Fun Shapes (Or Go Wild with Molds)
Here’s where the creative fun begins. Use cookie cutters for classic shapes—hearts, stars, leaves, or circles. I did a bunch of moons and clouds for a baby shower gift and they were a hit!
No cutters? Press the clay into silicone molds. They add a bit of depth and texture, and the clay pops out clean once it’s dry.
3. Poke a Hole If You Wanna Hang ‘Em
Want to hang your diffuser stone on a rearview mirror or doorknob? Grab a toothpick or skewer and gently poke a hole near the top of your shape.
Make sure it’s wide enough for twine or ribbon to fit through. Give it a tiny twist to widen the hole if needed. Once dry, you can’t fix it without cracking the whole thing.
✂️ Tip: If you forget the hole (like I did once), you can glue a loop on the back—but it’s never quite as clean-looking.
4. Let Them Dry (Patience, My Friend)
Now comes the hardest part: waiting. Air-dry clay usually takes 24 to 48 hours to fully harden depending on humidity. Flip them after the first day to help them dry evenly.
If you’re in a rush or your weather is humid (hello, sticky summers), pop them in the oven at 150°F (65°C) for about an hour. But don’t go higher—clay can get weird or even brown if overheated.
❄️ I once put them too close to a heat vent to “speed up” drying. They curled up like little tacos. Cute, but not functional.
5. Check for Firmness Before Using
You’ll know they’re done when they feel totally firm and cool to the touch. If there’s even a little softness in the middle—give it more time.
Lightly tap it. If it sounds solid, it’s ready for oils.
Honestly, once you’ve made your first batch, it gets addicting. There’s something so soothing about shaping these little stones and knowing they’ll smell amazing for weeks. My first time, I made way too many… then ended up using them everywhere—drawers, closets, even inside my gym bag.
Next up? Let’s talk scenting these beauties the right way. You don’t wanna just dump oil on ’em and hope for the best.

How to Add Essential Oils to Your Diffuser Stones
Okay, so here’s where I totally messed up the first time I made these. I was all proud of my clay stars and hearts, and immediately dropped essential oils on them while they were still a little… squishy. Don’t do that. I repeat: do. not. do. that.
Let’s walk through how to safely scent your diffuser stones so they last longer and actually, you know, smell good.
🧼 Step 1: Make Sure the Stones Are Completely Dry
This is critical. Your stones need to be 100% dry, not “eh, close enough.” If they’re even slightly soft in the middle, the oil won’t absorb properly and can mess with the clay’s texture—or worse, mold.
I like to wait an extra day after they feel dry, just to be safe.
🎯 Quick test: Tap the bottom with your fingernail. If it feels solid and sounds a little like tapping ceramic, you’re good to go.
🌸 Step 2: Flip ‘Em Over and Apply Oil to the Back
Why the back? A couple reasons:
- You avoid oil stains on the display side
- The scent still travels just fine through the clay
- It’s way less messy looking
Add 1–2 drops of essential oil. That’s it. I made the rookie mistake of drenching one once, thinking “more scent = more better.” Nope. It stayed greasy and actually stained my bookshelf. 😬
Less is more here. You can always reapply later.
🔁 Step 3: Reapply Oil When the Scent Fades
Depending on the oil you use and where you place the stone (airflow matters), the scent can last anywhere from 3 days to a week. After that, just add another drop or two.
If you’re switching scents, let the old one fade first. Mixing lavender with lemon might be okay, but peppermint and cinnamon? Kinda smells like angry toothpaste. 😂
🌿 My Favorite Essential Oil Combos:
Here are a few that’ve worked great for me:
- Lavender + Eucalyptus = calming and spa-like
- Lemon + Rosemary = clean and energizing
- Peppermint + Orange = bright and minty fresh
- Cedarwood + Vanilla = cozy and woodsy (perfect for fall!)
🔥 Hot tip: Use high-quality oils. Cheap ones fade faster and sometimes smell artificial. I learned that after a batch smelled like floor cleaner after a day.
🚫 What Not to Do:
- Don’t soak the stone in oil
- Don’t mix too many scents at once
- Don’t use oils with added color unless you want stains
- Don’t apply oils to wet or soft clay
- Don’t rub the oil in (just dab and leave it)
Adding oils to your diffuser stones is the fun part—it’s where the magic happens. You can customize your home’s vibe just by swapping oils. Sometimes I’ll even rotate scents by room. It’s like mood lighting, but for your nose.
Next up? Let’s talk how to use these little scented beauties all over your home, car, and even in gifts.
Creative Uses for Your DIY Clay Diffuser Stones
Here’s the truth—I started making these clay diffuser stones for fun… and now they’re everywhere in my house. Once you realize how versatile (and cute!) they are, it’s hard not to get carried away. These things are like little scent ninjas—subtle but powerful.
🛋️ In the Living Room
I keep one on a tray with some dried flowers on my coffee table. Adds just enough scent to the space without being overpowering. Lavender or bergamot works great here—something chill to match couch vibes.
Pro tip: Place them near open windows or fans so the air carries the scent.
🚪Closets and Drawers? Game Changer.
Okay, hear me out—these are amazing in drawers. I toss one in with my socks and another in the linen closet. They make everything smell fresh without that fake dryer-sheet smell.
Just make sure you don’t put them right on delicate fabrics—some oils might stain. I wrap mine in a little muslin cloth.
🚗 In the Car
This is my fave use lately. I tied a peppermint-scented stone to my rearview mirror with some twine. It’s like instant wake-up juice for your nose—especially on those sleepy morning commutes.
And it looks way cuter than one of those dangling cardboard trees.
💼 Desk Buddies
I’ve got one shaped like a mini leaf sitting by my keyboard. I refresh it with lemon or rosemary oil during workdays to help me focus (or at least pretend I’m not about to scroll Instagram).
⚠️ Warning: If you use clove or cinnamon at your desk, your coworkers will comment. Ask me how I know.
👶 Nursery Vibes (Carefully!)
If you’re using them around kids, just make sure the oils are safe—lavender, chamomile, or even unscented if you’re just going for decor. I made some moon and star ones for a friend’s nursery and she loved them.
Avoid strong oils like peppermint or eucalyptus for babies—they’re a bit too intense for tiny noses.
🎄 Seasonal Decor (Yup, They’re Festive Too)
Around the holidays, I make themed ones—pumpkin shapes with cinnamon oil for fall, or stars and snowflakes with pine or vanilla for winter. You can even paint the edges gold or sprinkle them with mica powder for sparkle.
They’re also fab for gift wrapping. I tied one onto a kraft-paper-wrapped gift last Christmas and my aunt thought I bought it from a boutique. Nope, just a little clay, oil, and love.
The best part? These little guys are super low-maintenance and can last forever if you store them right. Just tuck them in a zip bag or box when not in use, and you can rotate them year-round.
You’ll be amazed at how many ways you can use them once you start looking. They’re like the Swiss Army knife of home scenting—but way cuter.

How to Package Them for Gifts or Sale
So, picture this: I show up to a baby shower with a tiny kraft box tied up with twine, a leaf-shaped diffuser stone inside scented with lavender, and a handwritten tag that says “For sweet dreams 💜.” The mom-to-be? Literally teared up. That’s when I realized—packaging turns these humble little clay stones into something truly special.
If you’re giving them as gifts—or thinking about selling them—here’s how to do it right.
📦 Choose the Right Packaging (Eco-Friendly FTW)
I always go for kraft paper boxes or muslin drawstring bags. They’re not only cute and rustic, but also biodegradable and reusable.
- For single stones: small pillow boxes or cotton pouches
- For sets: recycled cardboard boxes with paper shred or tissue
- Add a dried flower sprig or eucalyptus leaf inside for extra charm
Avoid plastic. These are natural products—keep the vibe cohesive.
📝 Mistake I made once: used a ziplock bag and the oil smell got way too concentrated. My friend opened it and got hit with an aggressive lavender punch. 😅
✍️ Label Like a Pro (or Pretend to Be One)
Add a simple tag or sticker that tells people:
- The scent (e.g., “Calming Lavender”)
- What it is (e.g., “Clay Diffuser Stone”)
- How to use it (“Add 1–2 drops of essential oil to back side”)
- Bonus: A care tip (“Keep away from fabrics after oiling”)
You can use printable kraft labels or go full-on Pinterest with hand-lettered tags.
🧡 Personal Touches That Go a Long Way
If you’re gifting to someone specific, personalize it:
- Add their initial on the stone with a fine paint pen
- Choose shapes that fit their style (e.g., stars for a dreamer, leaves for a nature lover)
- Write a little card explaining why you picked that scent
It turns something simple into something deeply thoughtful.
🛍️ Selling Tips (Yes, People Will Buy These)
I’ve done a few local markets and made sets of 3 stones in cute gift boxes. Here’s what helped them sell:
- Bundle by scent theme: “Relax Set,” “Energize Set,” “Holiday Set”
- Offer a small vial of oil with each set
- Display a few open samples people can smell
- Keep prices fair—people love affordable luxury
💸 I sold a dozen sets at my first craft fair—more than half to people buying gifts for teachers or coworkers.
If you go online (like Etsy), great photos matter. Shoot them in natural light on a neutral background. And describe the scent experience in the listing, not just the materials.
Honestly, I think packaging is where the magic happens. It’s not just about making something smell nice—it’s about sharing a little piece of peace and beauty with someone else.
You never know—what starts as a fun afternoon project might just turn into your next side hustle.
So, look at you—you’ve gone from clay newbie to scent-slinger in just a few steps. Whether you made a batch for your car, your closet, or to give away as thoughtful little gifts, these clay diffuser stones pack a whole lot of joy into something so simple. It’s creative, calming, and (honestly) a little addicting.
I still find myself reaching for the clay on random weekends just to whip up a few more. There’s something kinda magical about making something with your hands and turning it into a small, beautiful tool for peace and presence.
From shaping the stone to choosing the perfect essential oil blend—every step is yours.
If this guide helped you, or if you made your own set of stones and loved the process, do me a tiny favor and pin it to Pinterest. That way, more DIY-ers can discover it and jump into the craft.
Let’s spread good vibes and even better smells, one clay stone at a time. 🫶
PrintHow to Make Your Own Clay Diffuser Stones at Home (Easy DIY Guide for 2025)
Learn how to make your own DIY clay diffuser stones at home. These handmade stones absorb essential oils and release calming scents—perfect for gifts, decor, or everyday aromatherapy.
Ingredients
- Air-dry clay (white or terracotta)
- Wax paper
- Rolling pin or glass bottle
- Cookie cutters or silicone molds
- Toothpicks, skewers, or chopsticks
- Essential oils of choice (lavender, lemon, peppermint, eucalyptus, etc.)
- Optional: twine, ribbon, acrylic paint
Instructions
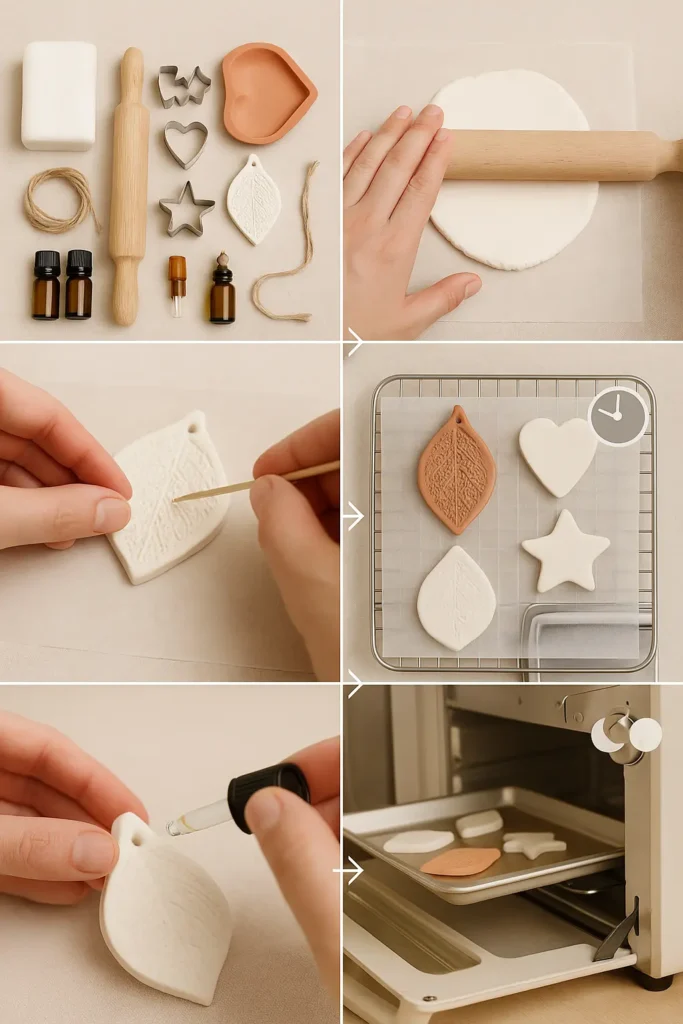
- Lay down wax paper and roll out air-dry clay to about ¼ inch thick.
- Cut into fun shapes using cookie cutters or press into silicone molds.
- Poke a small hole at the top with a toothpick or skewer if you want to hang them.
- Let the clay stones dry 24–48 hours, flipping once for even drying, or bake at 150°F (65°C) for 1 hour.
- Check firmness—stones should feel solid and ceramic-like.
- Apply 1–2 drops of essential oil to the back of each stone once fully dry.
- Refresh with oil when scent fades (about every 3–7 days).
Notes
Use high-quality essential oils for best scent and avoid adding oil before the stones are fully dry. These make great gifts when packaged in kraft boxes or muslin bags.


Thank you for the kind idea.
I love this little project! Can you share the brand of clay you used and where I can buy it? (Michael’s, Hobby Lobby, Amazon, or?) I’ve just had surgery and this is something i can do while recuperating. Thank you for sharing!